As a photographer, it’s essential to learn how to light, shoot, and edit a white backdrop, since these photographs are constantly in demand. And that too photographing products for an e-commerce site, your product photography, or a commercial photography project, white backgrounds are the most critical factors. Businesses that rely on selling items understand that e-commerce is essential to their long-term success today.

Branding is essential and beneficial for tangible products sold on websites. When it comes to brand photography, your product image must appear accurate and attractive. So, to achieve this look and feel, white background product photography images are considered the best option. Consumers will immediately desire to purchase this product if the picture is so aesthetically enticing to them.
Why and when to use a white background?
The backdrop is an essential part of advertising. White backgrounds are fantastic for catalog and commercial images. Still, it’s vital to correct the atmosphere to obtain the best results. While organizing your shoot and collaborating with your model or creating a mood board, it’s important to bear in mind that the atmosphere is often bright and upbeat instead of moodier, low-key shots.

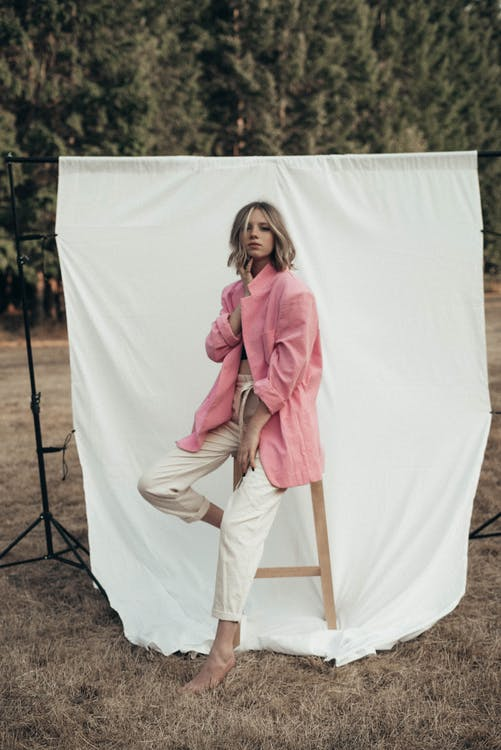
There are several ways to isolate your object. To achieve this, white backgrounds are among the most effective. Make sure you choose a topic that can stand on its own and pay attention to your presentation. A white backdrop is perfect for headshots, basic portraits, stock images, and product photography.
Considerations and requirements while shooting with white background
While considering shooting to begin, and most importantly, think about the actual product. Products need to be shown as clearly as possible with essential characteristics highlighted in product photography. There are certain things to consider, and they are listed below:
Lens
Consider your shooting perspective, lens, and camera settings while implementing a plan into action.
Background
The next thing is the background and the base considerations for this. It is prominent for the white background, so the best ever option to opt for is a flash on the background and sunlight.
Lighting
The third factor to consider is the distance between your subject, the backdrop, and the light.
Tripod
It holds the camera in place while aiming for the perfect white background shot.
Lenses / Camera
When shooting a shot with a white background, the lens and its setting play a prominent part. So, opting for a good lens and camera is vital. For the backdrop, you may choose a shutter speed of 1/250th of a second, an aperture of f22, and an ISO of 100.
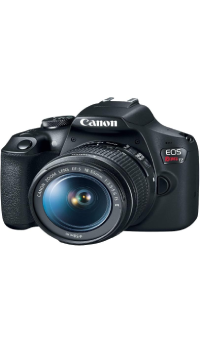
- The EOS Rebel T7 camera’s high-resolution 24.1 Megapixel APS-C sensor captures fine details and bright colors.
- Even in low-light situations, the camera’s colossal sensor allows you to get stunning pictures. For white backgrounds, a broad ISO range of 100-6400 (H: 12800) offers you the confidence to continue photographing even when the light is dimmer.
- With the DIGIC 4+ Picture Processor, high-ISO images may be processed up to 60% faster than with the DIGIC 4 Image Processor, enhancing image quality.
- By doing this, you can achieve more vibrant colors, smoother gradients, and finer details with less noise.
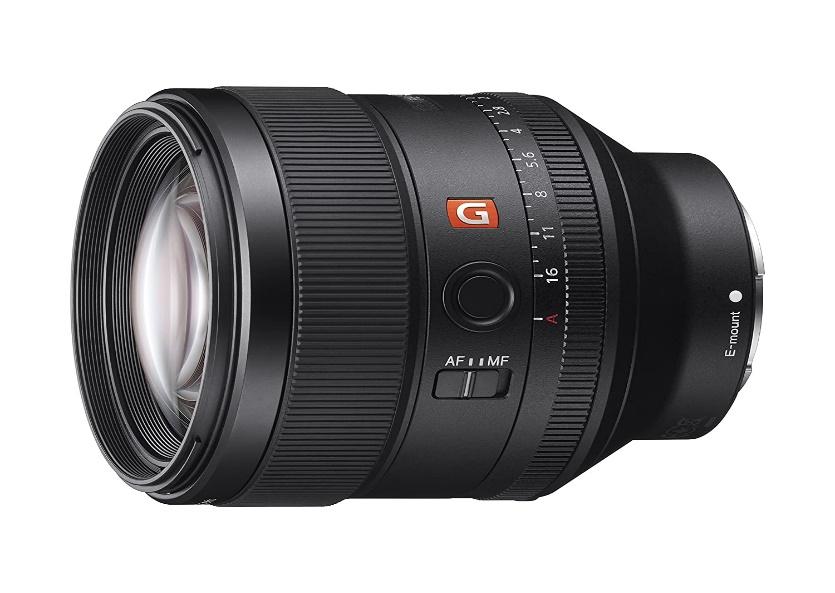
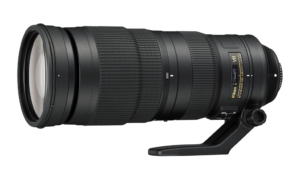
Sony FE 85mm f/1.4 GM Lens
- High resolution and sharpness are reported to be the primary goals of the optical design while also allowing for seamless transitions to out-of-focus regions.
- The new model uses a combination of rare aspherical and ED glass types to accomplish this. Eleven components are used, divided into eight categories. Sony’s Nano AR coating is included in the lens’s construction for increased contrast and color fidelity in dimly lit environments.
- Both picture and video shooters will find the unique linear SSM to be an excellent choice for their needs.
- There are more controls outside the lens than are typically seen on FE models, including focus and aperture colors and a focus hold button.
- An 11-bladed diaphragm, dust, and moisture sealing are among the other notable characteristics (80cm).
Canon EF 85mm f/1.8 USM Medium Telephoto Lens
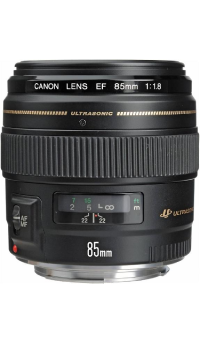
- Despite its low cost, the Canon EF 85mm f/1.8 USM Lens produces stunning images. The wide-open performance is adequate, but it truly excels at f/2.8 and beyond.
- Even on a 1.6x FOVCF body, vignetting will be seen when the lens is fully open. At f/2, full-frame camera users will still observe some vignetting.
- It’s fun to see what happens when you open the 85 f/1.8’s aperture wide. There is a significant bokeh effect because of an 8-blade aperture. Even at f/1.8, it is challenging to maintain both eyes in focus while photographing a close-up portrait.
- The color saturation and contrast are excellent.
- The Canon EF 85mm f/1.8 USM Lens focuses quickly and silently thanks to its ring USM (Ultrasonic Motor).
- The 85 f/1.8’s build quality is excellent. The weight and dimensions are ideal for a tiny, portable device. Take beautiful images without drawing attention to yourself with the 85 f/1.8 lenses.
Background
When photographing items for sale on the internet, white backgrounds are the norm. Most shops, especially those in the fashion, jewelry, and furniture industries, implement this strategy. This is because the benefits of a product’s features are easier to see against a white backdrop.
Yesler white muslin background

- Yesler white screen backdrop is 6 x 9.5 feet. The front side of the white background was made of muslin material, while the reverse side was composed of satin fabric.
- Shooting and editing can be done efficiently. The white screen background is composed of opaque muslin material. It is practically non-see-through and does not leak light. Also, the screen ensures successful filming and editing, such as cut-out and chroma key while saving time and increasing productivity.
- You can use this to set any professional backdrop, such as a studio photographic backdrop, a video broadcast screen, a camera interview, a product shot, a TV commercial, and so forth. 1 x white screen background is included in the package.
Picture lightbox
The (FFFFFF) color code is used in all brand pictures, implying a white backdrop. Thus, even if you find an image box and employ as little extra light effects as possible, the grey tone will still be less noticeable in your photos. When shooting goods in context, this provides an additional value to consider.

- The product comes with 80 high-quality SMD LED beads. The integrated ring light delivers ample brightness for photography.
- The box has a light that is either white, soft, or warm. Without stroboscopic lighting, this gets impressive results with this picture lighting studio kit’s 3200K warm light source and 6500K white light source.
- When it comes to photographing medium-sized goods such as cups, books, and other small items, 12*12 inches photo studio box is the best choice. It has a front horizontal shooting window and a vertical window.
- For photographers, artists, professionals, and product promotion initiatives, this is a must-have equipment.
Lighting
Lighting conditions play a crucial part in obtaining high-quality photographs. The right lighting conditions play a vital role in getting high-quality pictures. You may artfully handle the conflict with the correct sensibility and a certain familiarity between the object and the camera. With a modest quantity of active light, you may get the same impact as additional lighting or flash effects. The key is figuring out how to calibrate the camera following the lighting.
PHOPIK Softbox Photography Lighting Kit
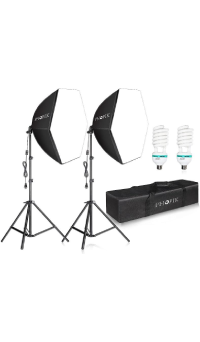
- Light coverage will be increased due to the unique hexagonal structural design, resulting in more excellent light effects throughout the photography process.
- An Adjustable Light Stand and 210° Rotatable Head are included in this.
- The two 85W CFL bulbs provided are equivalent to an 800W incandescent bulb in total, saving up to 80% of the energy used by incandescent light.
- Balanced natural illumination and constant uniform light are provided by bulbs that last for around 8k hours, with 5400K color temperature, allowing photographers to get the most out of their equipment.
- The softbox kit is suitable for a wide range of photography. You can utilize the softbox lighting equipment in various settings, including video production, photography, and live streaming.
Tripod
In order to keep your camera steady, you might use a stand that matches your camera’s best choice to go with is the tripod. Your equipment may be perfectly stabilized using a tripod. Before buying a tripod, consider the pros and cons of a ball head over a toothed mechanism as per your camera design.
Joby JB01507 GorillaPod 3K Kit

- Professional-grade camera equipment may be securely attached to any surface, thanks to this tripod.
- With a bubble level and a 360-degree panning bed, you’ll be able to manage your position precisely.
- It has Gorilla Pod arms and a hub adapter for attaching GoPro adapters, flash clips, lighting fixtures, and microphones compatible with JOBY pro-level accessories.
Handheld light meters
Handheld light meters can be used to measure the amount of ambient light present in a place, whether that light is natural or artificial. Fluorescents and LEDs might also be included in this category. Strobe exposures can also be measured by certain light meters. In reality, this is the case with most portable meters. Flash meters are a kind of meter that uses this technology.
The white dome on the top of a handheld light meter is what distinguishes it from other devices. The light passing through this transparent plastic is diffused to be measured as an incident reading.
Incident meters are a result of this. The light dome may be solid, rotated, and flattened to measure contrast (or light falling on a level surface). Also, it can be removed to reveal the light-sensitive photo sensor within the dome. When this sensor is pointed at a subject’s surface, it may be used as a reflecting meter to measure how much light bounces off the topic.
Light Meter Digital Illuminance Meter Handheld Ambient Temperature Measurer
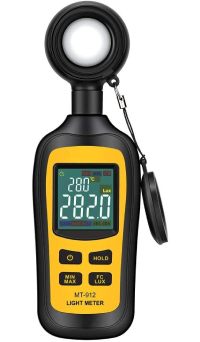
- Ambient temperature and luminance may be measured from 0 to 200,000 Lux.
- Min/Max readings, data hold, auto power down, and low battery indicator are all features that may be shown with an accuracy of 3% red 8 digits (10,000 Lux).
- You can use this both at the workplace and at home.
Guide to taking absolutely white background photos
- Plastics, cloth, and paper all have white backdrops, but the most critical aspect is avoiding wrinkles. Stretch fabrics, as well as paper or vinyl that are entirely smooth. These are excellent options.
- A compact lightbox may be a lifesaver when photographing items rather than people. Keep your tools and equipment clean.
- Using a white backdrop and forgetting to light the background separately will result in a mud-grey backdrop when photographing an item against it. So, to properly brighten your white setting, it’s essential to have a light source. Employ light to create a backdrop based on the object’s size.
- Use a portable light meter to check the lighting conditions. Measure the light on the backdrop and your subject while lighting them separately. Setting your desired shutter speed and ISO and having the camera suggest an aperture value will take care of things for you.
- Maintain a gap from the light and a distance from the backdrop while photographing. Suppose you’re not standing directly in front of a strong light source. In that case, this strategy will undoubtedly result in shadows on your backdrop.
- Make sure to turn on the camera’s technique of alerting you if a part of your image is overexposed, known as blinkies or zebras’ warnings to get a pure white background. Purposely overexpose those highlights to get a white backdrop.
- When taking full-body pictures, keep an eye on the ground. As a result, the floor may look darker in the camera than in the area right behind the subject.
- Keep an eye on the edges. Having a white backdrop may lead to a minor fall-off at the margins, but this can be fixed if the space around your subject is also white. Use the brush tool to paint over any grey edges you may encounter.
- Allow your auto mask to be enabled, shift the white slider to the right, and begin painting the region that isn’t completely white.

Pros of using a white background
- Adopting a white background allows you to adjust your arrangement while editing. You might add white surrounding your topic to make it seem horizontal, for example. You may also apply a reflection while editing to prevent the “floating subject” appearance in this step.
- White backgrounds are so simple to edit. You can use Photoshop’s magic eraser and background eraser tools to make your white backdrop translucent.
Here are some video tutorials and guides to white background photography
How to Put a White Background on a Picture 2-Minute Tutorial
White Background Photography Tutorial: How to Take
Your Full Guide to White Background Product Photography
When can I use a white background?
To promote a product or photograph a person for web promotion, a white backdrop is often employed. This type of photography is called product photography. Speaking directly to your customers is a great way to set yourself apart from the competition while bringing you closer to your target market. If e-commerce provides context for the clients, they are more likely to grasp that the product is made just for them. As a result, posting photographs on social networking sites would promote purchases.
This technique makes people want to purchase it by conveying inspiration and ambition in an aspirational way. In addition, white background photography is used for promotions and complementary products. Using photos with a white backdrop in category listings, for example, ensures consistency in the way we see outcomes.
The issues with photographing on a white background
- When photographing a subject, the most common mistake is to place them too near to the backdrop. Shadows may be thrown on the scene by this.
- When lights are placed in front of your subject, shadows are cast on the backdrop. It is reduced or eliminated by adding lighting from the front.
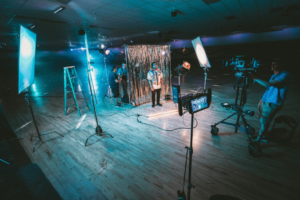
Employing White Background in Studio Photography
As a photographer, it is essential to have adequate lighting equipment and the proper backdrop material. A lack of lighting will make it impossible to achieve the desired white on the background.
When photographing portraits, employ manual mode and spot meter. To get the most outstanding results from an auto or semi-automatic mode, you’ll need to apply an exposure lock.
A process carried out in studio photography with white background
- Use a white wall or other white surfaces in your photographic studio. Place your backdrop approximately a meter away from it.
- Make use of two or more high-powered strobes to illuminate the subject. On top of it, mount broad dish reflectors. Away from the backdrop, point them towards the wall. Set the output to its highest.
- The number of strobes required depends on the size of your backdrop.
- The lights must be positioned such that they aren’t cast onto the backdrop. In this way, they will illuminate the scene equally and reflect off the wall.
- There will be two hot spots on the backdrop of the two light stands positioned in front of it. Take a picture of the white background; the backdrop must be visible. To get the best results, keep an eye on your camera’s exposure settings.
- Keep moving flashing lights and position them in a place if the light is not placed even.
- Make sure lights are in the right place to brighten the background with a consistent, balanced light source.
- Use 1/250th of a second, f22, and ISO 100 for the background exposure.
- For the type of shot set up the required number of lights and reflectors.
- At least three stops of light reduction should be applied to your subject.
- Set your camera to 1/50th of a second at f8 and ISO 100 or the equivalent for taking a picture.
- Check your picture by taking a few trail images before going for a real shot.
The aftermath of a photo shoot in the studio
- Use a computer to make sure the images have a completely white backdrop after the shoot. To do this, alter the brightness levels or curves from the left side (dark pixels) to the right side.
- Backgrounds that aren’t pure white will deepen or become black. Light levels and exposure may be toyed with forging the dispersal of the light. Avoid overexposure by moving your subject away from the backdrop.
Outdoor White Background Photography
To take white-background photos outside, you need to have the correct equipment. Unlike the studio approach, however, it is less dependent on equipment. To do this without using any electrical light sources, having the right white backdrop, reflector, and sun is required. You may use white fabric to cover the white location outside. The light reflected from the ground will be used as the front lighting setup.
- Place some white plastic sheeting on the floor and use one or two-fold out reflectors to bounce some light back into the subject’s face in order to achieve pure white light.
- It’s just as easy to use the sun to backlight as it is to use a backlight in the studio. The subject must reflect lighter than the backdrop does. Make sure the camera’s exposure settings are precise for this.
How to take Headshots using white background?
White background with soft, even lighting is often requested by businesses, theatres, and schools that require professional headshots for their internet persona. One of the most challenging aspects of creating equal, white-backdrop photos for most photographers involves lighting modest, corporate-style headshots in a higher-key environment.
Several feet, the lights must be placed above the subject, pointing downward at the object and facing it at a right or left-leaning angle. Then place the fill on the other side at a similar angle and below the subject by 1/2 foot –low to fill the whole ground area.
It is recommended you shoot at a shutter speed between 1/100th and 1/250th of a second, which is neither too slow nor too quick to cause motion blur while using a flash. Observe your light meter concerning the wall you are illuminating. At several points along the wall, take a reading.
A constant f-stop reading from the light meter has to be obtained. Even though the wall is reading f/8 on one side, the other side reads f/5.6, which means that only half as much light reaches the f/5.6 side. Make sure that the whole wall or background is reading at f/8 with the strobes.
The backdrop must be much brighter than the subject. Increase the ratio to 4:1, begin with a 2:1 ratio. Shoot between ISO 100, f/8-f/11, 1/160-1/250 sec., and the strength of the strobes according to those settings. Use the power of the lights working to adjust the settings. A field monitor will allow users to observe your scene in more detail.
Watch videos on how to take Headshots using a white background
How to Photograph Portraits on PURE WHITE
How to get a pure white background in a studio portrait
How To Get a Perfect White Background Without Photoshop!!
White Background Lighting technique with a softbox
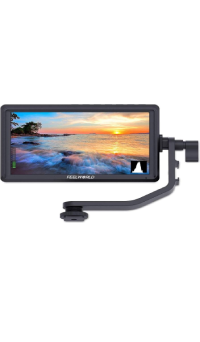
What is a field monitor?
Field monitors provide the same view seen in the camera but on the External onboard display, which is battery-powered. The monitor is attached to the camera or camera gear. Thinking of buying a field monitor, click the link below.
Shooting a white object on white background
For e-commerce websites, white backgrounds and low contrast from highlights to shadows are necessary. Overexposing both the foreground and background of a white object against a white backdrop is the most common mistake when shooting a white product against a white background.

- Place the subject in front of a lightbox or white backdrop. A tripod can help take better photos by holding them. Still, it’s also possible to get outstanding pictures by hand-holding the camera.
- Start by setting the camera to the maximum feasible shutter speed that will sync with the light. From 1/160 to 1/200, this is the range of values. If unsure about the syncing speed of the equipment, set it to 1/160. Doing this may reduce the amount of ambient light in the photograph.
- Between F8 and F11 is the ideal aperture for any lens. The greater the F value, the greater the depth of field — in other words, the more of the product will be in focus. An Aperture of F8 is a good starting point; a greater depth of field is required, increasing the aperture to F11 or higher to concentrate on more of the subject.
- Shoot RAW mode and use the option Flash White Balance and a 5-second self-timer to reduce camera shake. In the case of a handheld camera, you need not set a timer.
- Use a meter to measure the brightness of your light. Determine the proper aperture for your scene using your light meter. Take a practice shot and check it via histogram. In comparison, the histogram is a visual representation of the number of pixels in a picture. There are three distinct sections: the highlights, the shadows, and the mid-tones.
To get more ideas on this, click on the video links below for white-on-white background
How to photograph White on White?
How to Photograph a White Product on a White Background?
Your Full Guide to White Background Product Photography
Setting up the light
When photographing, set the primary light directly in front of the subject. Let the softbox be 1.5 meters away from the subject. This is because the radio flashes must be linked to the camera and the leading light.
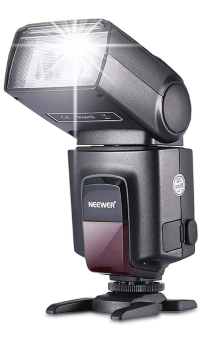
A flashgun and camera are needed to create a stunning image. It would help if you placed the flashgun on top of the subject, and the ceiling must not be too high to avoid a gray background. To get a flashgun, click on the link below.
The final wrap up
A white background is not the conclusion of the creative work but a new commencement. Create photographs that can be utilized with delegacy and also treasured in the future. A white backdrop might be challenging, but if mastered, there’s nothing quite like it.